

I’ve been dying to use my blog to give you all some photography tips! So why not start now?? And what better way to start than by walking you through getting better photos with your cell phone?! I do a lot of photos of children and hairstyles, so the theme of my sample photos will be mainly those subjects.
I have learned everything I know about photography online, and for free! I’ve spent hours upon hours searching through blogs and videos each time I was ready to progress a little. I do not claim to be a professional, I still have a ton to learn, but I have a lot of tips that will help beginner photographers!
I would love to give back and offer as much advice as I can because I think everyone should be able to get on their computers and learn what they are passionate about. Not everyone has all have the money or time to spend on college courses!
I’ll post as often as I can, and if you have any specific subjects you would like to request that I cover, please contact me and I’ll do what I can!
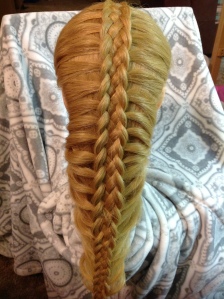
I started out on Instagram with nothing but a smart phone with a terrible quality camera and a passion for braiding. So this is where I’m going to start! If you yourself have nothing but your IPhone or Android, or a point and shoot digital camera, these tips will help you out a lot! Here is an example of a braid photo that I shot back then!

I thought I was pretty good! Ok, I didn’t actually think I was good at photography. I didn’t have much to work with, but I made do with what I had! And you can too! I can spot a handful of things right away that would have improved my photos of this simple but pretty hairstyle.
One of the most basic things that helped me from the beginning was to GET OUTSIDE and FIND THE SHADE.
The biggest problem I see is that when people finish a braid and they are dying to share it with their followers, they grab their camera and shoot a photo right where they were working. PLEASE don’t do that. As gorgeous as that braid may be, you’ll lose all of its beauty by not taking the time to care about the setting! You took all the time and effort to do the work, so take a few extra minutes to document it! Trust me, your followers will thank you!
This photo is a great example of what NOT to do. I attempted to hide the background and the fact that this is a mannequin and not a real head with a blanket. Did it work? Nope. It just distracts from the braid and for most of the people who saw this photo (I’m not even sure this actually got posted until now) they probably thought, “Cool braid…but weird photo.” The chances of a photo like this being reposted are slim to none. Is the braid deserving of attention, probably. But is the photo? Heck no. People care about the photo, not just the braid. And if you want your work to be seen, take the time to learn to photograph your braids well with the tools available to you!


This is a really good example of what I was talking about. I was braiding at night, and I was dying to show off this one because I loved the way it turned out, so I went ahead and took a photo indoors, at night, at the table where I was braiding. ALL of the worst mistakes you can make. The next morning, I took it outside and set it on a table and shot it again. It’s easy to see that taking a little extra time to shoot in the correct lighting is well worth it.
Here’s what you can do instead:
If you must shoot indoors, find a good window that is letting in plenty of natural light to shoot near.
DO: Place your subject to the side of the window or with the window directly behind it
DON’T: Place your subject directly in front of the window.
If you try to shoot with the subject directly in front of it, the camera will try to meter for the light instead of the subject, and it will leave your subject completely dark. Instead, turn them so that the side of their face is in front of the window and then you can stand directly in front of them. There’s no need to be up against the window. You can/should be a couple to a few feet out from it. What you’re trying to achieve is a natural lighting, indoors.
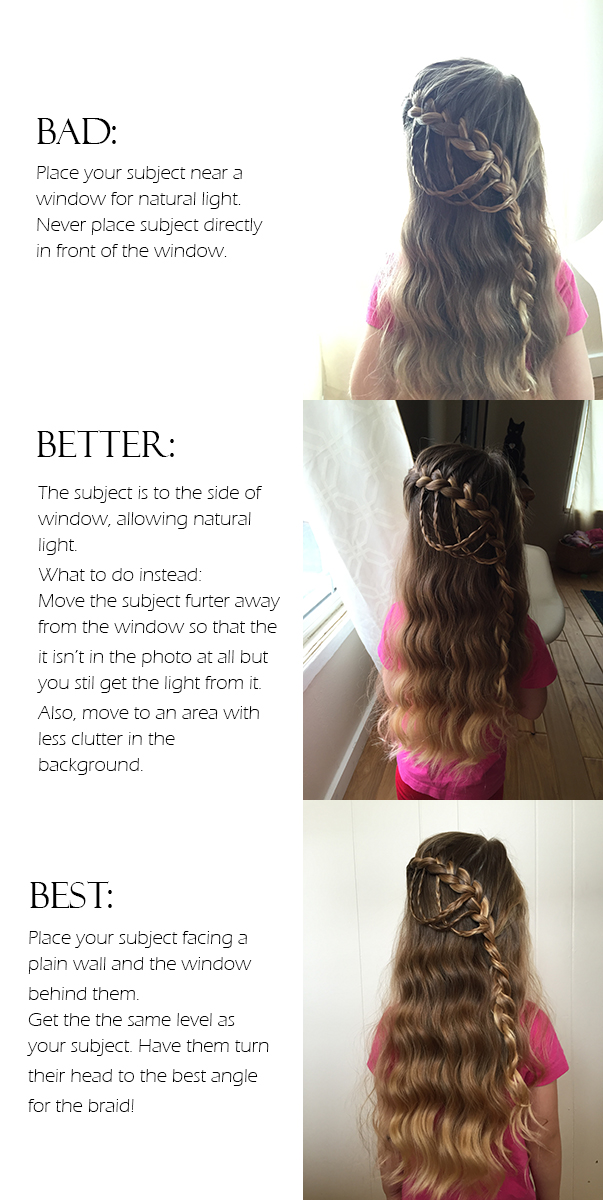
In the first photo, I placed my daughter directly in front of the window. The camera automatically adjusted the exposure so that the light was perfect but my daughter was completely dark. So I touched her head on the screen, which caused the camera to readjust the exposure for her head. As you can see, though, the braid is still underexposed and the lighting looks terrible.
What you can do instead:
Place your subject to the SIDE of the widow, or have your subject stand with their back to the window, up against as plain a wall as possible. This will cause the braid to be lit well, allowing as much detail of the braid to be seen well, without any distractions.
Try to get as little clutter in the back of the photo as possible. If there is stuff in the background, take a minute to tidy it up before shooting. Even if this just means shoving everything a few feet over so that it’s out of the photo. I have been known to shove a mess, or even furniture around our house to get the shot I want! People don’t mind seeing your desk in the photo, but they don’t want to see your dirty laundry or your kids toys thrown everywhere. My house is almost always a mess (ok, ALMOST always is an understatement) but I would never let you know it in a photo! 😉
Never use your flash. Just don’t. Unless you really know what you’re doing with a flash, all it’s only going to do is destroy your photo. It adds a terrible, unnatural glow to your subject. Luckily, most phones these days are really good at shooting even in low light settings without the flash! If you want to add a little brightness, you’re better off doing so by adding it after the fact in an app that allows you to adjust the brightness, contrast, etc. If you’re working with Instagram, you can do it directly on there.
Get outside and get into the shade! If at all possible, the best way to shoot is outdoors. The natural lighting will do your braid the most justice, especially if the subject is brunette.
When I say shade, I don’t mean spotty shade from a leafy tree. I usually try to find either a dense tree or shade that a wall or a fence is casting. You don’t want little spots of light to be hitting your subject. You want a nice, consistant shade. Once again, please take notice of your background! Plants and flowers are pretty or even just a plain fence
Angle and positioning:
The angle in which you stand has a great effect on the end result of your photographs. If you simply walk up to your subject and start shooting, chances are, your photos are going to be terribly boring. The position of your in your background is also of great importance.
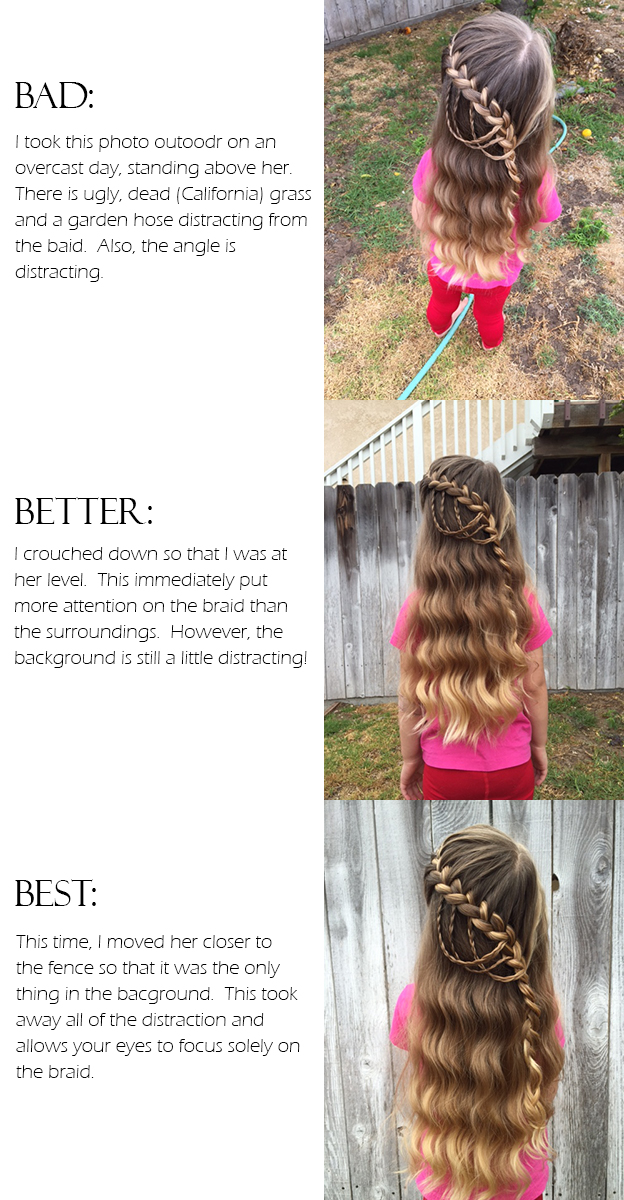
Instead of just standing above the subject like in the first photo above, try getting down to the same level as your subject. When you’re taking photos, the biggest key is to move around and find your best angle! You can for sure get more artistic with your angle if that’s what you’re going for, but chances are for a braid photo, you want the main focus to be your braid. I find that the best placement of the subject is right in front of a nice, plain wall or fence. This allows for your eye to be drawn right to the braid.
Editing:
The sad truth is, there is no way to achieve background blur with an iPhone camera. Maybe…hopefully in the future it will be, but for now, no such luck. Background blur makes photos look a lot more professional and interesting, so you need to make your photo pop another way.
Adding a filter to your photos will make them pop and stand out. You can use the ones directly on Instagram (I use them about 90% of the time) or you could purchase or download a free app for filters. One of the ones that I use is Color Story. Their filters are nice and bright and their in app purchases are pretty cheap if you decide to go that route. There are MANY filter apps out there though, so play around and find your favorite!
When you are choosing a filter, try to keep in mind that it’s best to pick a theme and stick to it as best as possible. Try to remember that when people are looking for new people to follow, your page is your portfolio. The more pleasing the entire thing is to the eye as a whole, the more likely people will follow.


The photo on the right is the original without a filter. On the left, I added the Ludwig filter and as you can see, it makes the photo pop! If you like the filter but it’s a little too intense, just tap on the filter again and it will pop up with a little slider that you can adjust the intensity of it! Also, black and white photos are very forgiving, making that a really good choice of filters if you like that look.
I have to say I haven’t completely stuck to this as much as I would have liked to, but the more you stick to ONE theme, (in this case braids) the better. If you start posting photos of your pets, your coffee and your BFFs mixed in with all of your braids, you’ll start losing followers quickly. So if you’re planning on posting braids, it might be best to create an account specifically for braids and stick to the theme. This way, you won’t jam up your friend’s feed with braids when they aren’t interested in them, and you won’t annoy the ones that follow you to see the braids.
Lastly, I just have to put this out there because it is totally my most hated thing on Instagram. Never, and I repeat, NEVER ask for a shout out. It’s so annoying and desperate. The best way to gain more followers is to be as active as possible on Instagram. Find accounts you love and like a bunch of their photos. Leave a genuine and kind comment on one of their photos. Chances are, they will see your comment, click on you to see what you’re all about, and follow if they like what they see. Earn your following through high quality, interesting content!
If you learned something of value by reading this article, please leave me a comment! I’d love to hear from you!
My next post will be about photographing braids with a digital camera, so be sure to subscribe if you don’t want to miss out!


I am so glad I came across this post. I am doing a lot of things wrong. I am going to start taking your advice. Thank you so much!
LikeLike